Autumnal Pumpkin-Gingerbread-Muffins

IMG_7960

These muffins just perfectly match the actual season here in Switzerland: autumn. What do you associate with autumn? For me it’s definitely pumpkin and gingerbread! At least when talking about food. Pumpkin is so versatile, you can make pumpkin soup, pumpkin risotto, roasted pumpkin, pumpkin mousse, pumpkin pie and so on. And gingerbread is just an autumn-must-bake. So I added those two and made some two-flavoured muffins. I actually had the idea when strolling through a baking store. I found some special “muffin-dividers” which can be used to halve the muffin tin. Then you can place one flavour on one side and the second flavour on the other side. Don’t forget to remove the “muffin-divider” before baking. 😉

IMG_8089 (2)

If you don’t have this device you can simply add both doughs and then combine them with a fork (like you would do with a marble cake). When using the “muffin-divider” you could also use a fork afterwards to create a fancy pattern or just leave the line between the doughs straight.

IMG_7981 (2)

Duration

30min preparation time

30min baking time

Ingredients (makes 8 muffins)

For the pumpkin dough

❖ 125g flour

❖ 1tsp baking powder

❖ 10g vanilla sugar

❖ 30g whole cane sugar

❖ a pinch of salt

❖ 1tsp cinnamon

❖ 1/4 tsp nutmeg

❖ 1tbsp soy flour + 2tbsp water (or any other egg substitute)

❖ 50ml rape oil

❖ 75g pumpkin (already cooked)

❖ 50ml water

❖ 35g maple syrup

For the gingerbread dough

❖ 125g flour

❖ 1tsp baking powder

❖ 10g vanilla sugar

❖ 30g whole cane sugar

❖ a pinch of salt

❖ 2tsp gingerbread spice

❖ 1tbsp cacao powder

❖ 1tbsp soy flour + 2tbsp water (or any other egg substitute)

❖ 50ml rape oil

❖ 35g agave nectar

❖ 10ml soy milk

Method

  1. Let’s start with the pumpkin dough: Mix all the dry ingredients. Mash your cooked pumpkin with a fork, then add together with the liquid ingredients to the mixture.
  2. Now take a second bowl and mix the dry ingredients for the gingerbread dough. Afterwards add the liquid ingredients and mix well.
  3. Preheat your oven to 180°C.
  4. Now comes the tricky part: Either use the special “muffin-divider”, like I did, or add a bit of each dough to the muffin tin, then swirl the doughs with a fork to combine. If you are using the “muffin-divider” place it in the middle of your muffin tin, then add the pumpkin dough on one side and the gingerbread dough on the other. Gently remove the “muffin-divider” and swirl he doughs with a fork for a fancy look.
  5. Bake your muffins in the preaheated oven for about 30min.

Chocolate Tartlets with quinoa base

IMG_7955 (2)

Hey guys! Long time no post, but I am back with an amazing recipe. If you follow me on instagram (@greenishfoodie) you might have already seen these pictures:

IMG_20150912_170517

IMG_20150916_220742

I was really busy the last few days, because I started university some weeks ago. I promised to share the recipe and now finally found the time to write this. Just one last remark before you start baking 😉 : I participated at the2015instagramfoodieexchange launched by Lara, who is the owner of a vegan blog called vanillacrunnch and also one of my favorite bloggers! To participate you had to sign in and were then paired up. The idea of it is, that you send each other a parcel of little treats, teas, chocolate or whatever you like to send. You can already find a little sneakpeek of one of the three sweets I baked. And I am going to share the recipes here on my blog soon, so stay tuned 😀 .

Duration time

40min preparation time

10min baking time

2h of rest in the fridge

Ingredients (makes 4-5 tartlets)

❖ 1tbsp whole cane sugar

❖ 30g maple syrup

❖ 1tbsp nut butter (I used almond butter)

❖ 50g chopped hazelnuts

❖ 30g quinoa pops

❖ 20cl coconut cream

❖ 120g dark chocolate (I used a really dark one, I think over 80%, beacause I didn’t wanted it to become too sweet)

Method

  1. Preheat your oven to 180°C circulating air.
  2. In a small pan bring the sugar, syrup and the nut butter to a boil, then take the pan away from the stove.
  3. Add the hazelnuts and quinoa pops, mix well.
  4. Now take 5 small cake molds. Depending on their size you might also just need 4. Use margarine or oil to grease or just baking paper. Now distribute the mixture evenly, then form tartlets by pressing the mixture to the edges.
  5. Bake in the preheated oven for about 10 minutes. Then let your tartlets cool down.
  6. Again take a small pan, now heat up the coconut milk, add the chocolate, let it melt and mix to a homogeneous mixture. Let it cool down, then fill in the tartlets. I added a bit of additional coconut cream on top and made a little swirl with a fork.
  7. Leave in the fridge for 2 hours before you enjoy them.

Cookbook tip:

I adapted this recipe from one that I found in the lovely cookbook Pâtisserie Vegan. It is in french though 😉 . My parents bought it for me during their holiday in France. There are so many delicious threats in there, I am defenitely going to try more of its recipes. If you try any of my recipes add the hashtag #lucysveganrecipes on instagram, i would love to see your creations 🙂 .

IMG_7958 (2)

Potatoe-Chips – healthy snacking

IMG_7732 (2)
These baked potatoe chips are definitely a healthier choice than bought ones. They are completely oil-free. I added about a teaspoon of salt, because I didn’t want it too salty, but you can add as much as you like. And of course any other spices just as paprika, curry or garlic powder. I used two normal and two black potatoes we had at home. My father brought the black ones from his last trip to Peru and I was exited about using them as soon as possible. I also planted some of them in my little bed in the garden, I hope they will make it. 🙂
IMG_7731 (4)

Duration time

15min preparation time

15-20min baking time

Ingredients

❖ 4 potatoes (I used two normal ones and two black potatoes)

❖ salt

❖ paprika (or any other spice you like)

Method

  1. Preheat your oven to 180°C circulating air.
  2. Wash your potatoes, then cut them in fine slices. The thinner the slices, the crunchier your chips will be afterwards.
  3. Put the slices on paper towels and press another one on them, so that the towels soak the water of the potatoes from both sides.
  4. Put the slices in a bowl, add as much salt and paprika as you like, then stir gently.
  5. Take two baking trays, cover them with baking paper, then put your slices one next the other, but not overlapping. (If you use only one baking tray, you can just use it again, after the first round of chips is done).
  6. Put the potatoe slices in the preheated oven for 15 to 20min, depending on how thin your slices are and if you are making two trays at the same time or just one. Stir every now and then, to be sure they don’t get burned.

Tip

I prepared some guacamole as well to eat with the chips… delicious!!

Oat Cookies – ready in a blink and a perfect breakfast snack when travelling

IMG_7877 (2)

My holiday is over soon. I am starting university in a week. But I had a really nice summer break and travelled to Italy and Spain. I already told you about my trip to Italy and that I visited the exposition 2015 in Milan. In Spain I met some friends who live close to Valencia. As my flight left at 7am and I had to take the train at 5, I prepared some breakfast cookies the night before, which I could eat on the way, because I was not really in the mood to eat breakfast at 4:30… With the base recipe made of banana and oats you can basically add whatever powders, nuts and dried fruits you normally put in your morning oatmeal. I used cacao, almonds and cranberries. This recipe is a perfect on the go snack you can eat for breakfast or between meals.

IMG_7873 (2)

IMG_7890 (2)

Duration time

5min preparation time

15-20min baking time

Ingredients (makes 7 cookies)

❖ 2 ripe bananas

❖ 150g oats

❖ 1tsp cacao

❖ 25g almonds

❖ 15g cranberries

Method

  1.  Preheat your oven to 180°C circulating air.
  2. Mash the bananas with a fork. Add to a bowl and mix with oats and cacao.
  3. Chop the almonds coarsely, then add together with the cranberries to the mixture.
  4. Start forming your cookies. Mine had a diameter of more or less 6 to 7 centimeters and were about 1 centimeter high.
  5. Put them on your baking tray, make sure to cover it with baking paper first.
  6. Now bake for 15 to 20 minutes. I even flipped them over after 10 minutes, just to make sure the bottom side doesn’t get burned.

Tip

I only took three of them with me for breakfast.

Plum and Apple Jam – made with less sugar but chia seeds instead

IMG_7866 (2)

The jams you can buy in the supermarkets mostly contain a lot of sugar. Sometimes when I check the ingredients it even says 40% of fruit per 100g of jam. That’s a lot of sugar! The sugar helps to sweeten but also to get the desired consistency. For this plum and apple jam I used chia seeds. They soaked the superfluous liquid, so that the consistency got more jam-like afterwards. Therefore it was not necessary to use that much sugar. This jam contains approximately 85% of fruit per 100g of jam.

IMG_7856 (2)

Duration time

15min preparation time

30min cooking time

30min for the jam to cool down

30min for the chia seeds to soak

Ingredients (makes two jam jars, see pictures above)

❖ 550g plums

❖ 2 apples (about 325g)

❖ 150g whole cane sugar

❖ 1 vanilla bean

❖ 2tbsp chia seeds

Method

  1. Wash your fruits, remove the stones, then chop them into cubes. Add them to a big pan, cover with sugar. Now take your vanilla bean and scrape out the core. Mix with the ingredients in the pan. I also used the remaining vanilla bean and added it, so that it could cook with the fruits. Don’t forget to remove afterwards.
  2. Now heat up your pan with the lid on top. The fruits lose their juice in this process. So when it came to a boil, lower the heat and let it simmer for about 30 minutes in total. Stir every now and then, to make sure it does not burn on the ground. After 25 minutes take away the lid and stir for the last 5 minutes. The fruits are really soft and mostly decomposed by now. When the consistency is rather firm, let it cool down.
  3. Once it is cooled down add the chia seeds. Wait 30min for the chia seeds to soak, then fill your jam jars.

Carrot and Plum Granola – absolutely love this combination

IMG_7819 (2)

Here comes another granola recipe 😀 . This one is probably a bit more adventurous than the other two I shared in the post Homemade Granola. It may seem a bit strange to add carrots in your granola, but I promise, it is sooo delicious. I got inspired by some carrot oatmeal recipes I found. Then I made me some for breakfast and liked it a lot. So I thaught why not adding carrots to my granola. The carrots and plums resulted to make such a good couple. And plums are in season right now here in Switzerland. You could also use any other fruit you like or is in season. Give it a try!

Duration time

15min preparation time

15-20min baking time

Ingredients (makes 230g of granola)

❖ 4 dates

❖ 25g almonds

❖ 2 carrots (about 130g)

❖ 3g ginger

❖ 1tbsp lemon juice

❖ 1tbsp maple syrup

❖ 15g quinoa pops

❖ 70g oats

❖ 20g sunflower seeds

❖ 4 plums (about 115g)

❖ 0,5dl water

❖ 1tsp cinnamon

❖ 2tsp cacao

❖ 1/2tsp kardamom

Method

  1. Preheat your oven to 180°C circulating air.
  2. Chop the dates and almonds coarsely.
  3. Grate the carrots and ginger into a bowl. Add the lemon juice, maple sirup, quinoa pops, oats, seeds, dates and almonds. Stir well.
  4. Remove the stone of the plums, then cut them in really small pieces. Take a pan and shortly heat up the plums together with the water. Add cinnamon, cacao and kardamom, then add the rest of the ingredients. Mix everything well together.
  5. Take a baking tray, cover it with baking paper, then spread the mixture over it. Bake in the preheated oven for 15 to 20 minutes. Don’t forget to stir every now and then, so that the granola doesn’t burn.

Açai Breakfast Bowl

IMG_7708 (2)

The dark blue little berries from the brasilian rainforest, known as açai, triggered a big hype being a great superfood. I finally bought a package of açai powder, when I was in Milan to visit the EXPO 2015. Btw. I really recommend visiting the exposition, it was so interesting. And you can get a lot of food from everywhere around the world in the various pavilions there, which is amazing. And there’s also a lot of vegan food! So I bought the açai, because I was curious about how it would taste and its effect. Don’t get me wrong, I don’t doubt, that it is a superfood with nice benefits. It is especially known for its huge amount of antioxidants. I just think that grape seed flour for example is also a nice supply, which you can mix in your morning granola or smoothie. It is full of antioxidants as well, and I can get it cheaper than açai. But I really enjoyed this açai bowl, which I had for breakfast. I am such a breakfast-person. And I have some more coming breakfast recipes planed. 🙂

So in case you are wondering, the açai bowl is basically a smoothie mixed with the açai powder, served in a bowl. I added one teaspoon of cacao to mine as well. Afterwards you can decorate it with whatever you like.

About antioxidants: They help to protect our cells against free radicals, which are in our body and try to harm them. Without the antioxidants our cells would be more delicate and could easily be attacked, which has the consequence that we get sick. This can even lead to cancer. So the antioxidants are an important part of a healthy nutrition. But don’t worry; vegetables, fruits, herbs, salads, sprouts, nuts and natural oils and fats also contain antioxidants.

IMG_7710 (2)

Duration time

5min

Ingredients (makes one bowl)

❖ 2tsp açai powder

❖ 1tsp cacao

❖ 1 banana

❖ 75g frozen berries (I used raspberries and blackberries)

❖ 2 apricots

For the topping I used:

❖ a mixture of seeds and nuts

❖ blueberries

❖ 1/2 banana

❖ some chia seeds

Method

  1. Blend the ingredients, then serve in a bowl.
  2. Add the toppings you like.

Nutty-Tasting Glutenfree Bread – although it is completely nutfree

IMG_7588

Maybe you are wondering about this strange description “nutty-tasting” but “nutfree”. This bread is made of four different flours, which happen to give it a nutty flavour. Especially the grape seed flour and buckweat flour add this special nutty taste to the bread. In addition I added some seeds for the crunchiness.

The grape seed flour is made by pressing the oil out of the seeds of the grapes. The outcoming powder has a nice benefit: It has a lot of antioxidants! And they don’t get lost when baked in high temperatures.

bread

Duration time

15min preparation time

1h to let the dough rest

45min baking time

Ingredients (1 bread)

❖ 100g seeds (I used a mixture of sunflower, pumpkin, pine and soybean seeds)

❖ 100g grape seed flour

❖ 200g rice flour

❖ 200g buckwheat flour

❖ 100g chickpea flour

❖ 50g oats (glutenfree)

❖ 7g dry yeast

❖ 1tsp salt

❖ 400ml lukewarm water

❖ 3tbsp oil

Method

  1. Roast 85g of the seeds in a pan (without oil).Then let them cool down.
  2. Mix the roasted seeds, all the flours, oats, yeast and salt. Then add water and oil. Kneat the dough with your hands or a kneading machine.
  3. Let the dough rest for 1 hour in a bowl covered with a kitchen towel.
  4. After one hour preheat the oven to 175°C circulating air.
  5. Afterwards kneat again, then form a bread (use some flour, so that it doesn’t stick). Put the remaining seeds on top of the bread. Bake on a baking tray with baking paper for 45 minutes.

Super Fluffy Chocolate Brownies

brownie1

After the last two healthy recipes – Homemade Granola and Quinoa Bowl -, this brownie is anything but healthy. But who cares, sometimes you just need a big piece of warm chocolate brownie straight out of the oven. 😍

Btw. if you recreate one of my recipes share them with me on instagram with the hashtag #lucysveganrecipes. I’d love to see your dishes 🙂 .

IMG_7634

Duration time

20min preparation time

20min baking time

Ingredients (makes 12 pieces)

❖ 275g g flour

❖ 120g whole cane sugar

❖ 30g cacao

❖ 1tsp baking soda

❖ tsp baking powder

❖ 75g melted margarine

❖ 150ml vegetable milk (I used 75ml hazelnut milk and 75ml soy milk)

❖ 125ml maple sirup

❖ 70g hazelnuts

❖ 200g dark chocolate

Method

  1. Preheat the oven to 180°C circulating air.
  2. Mix flour, sugar, cacao, baking soda and powder. Then add the liquid ingredients margarine, milk and maple sirup. Stir well.
  3. Chop the hazelnuts and chocolate coarsely. Then add to the mixture. Take a baking tray, cover it with baking paper and spread the dough 1,5 cm high. Bake in the preheated oven for 20min.

Homemade Granola – Two Crunshy Recipes

I became obsesses with making my own breakfast granola. That’s also why I have two recipes to share with you today. Making your own granola is way more healthier, because as you may know, most of the products you can buy in the supermarkets contain way too much sugar. That’s the first reason I love homemade granola. The second is, you decide what ingredients to put in the mixture. You don’t like raisins? You leave them out. You love apples? Add some dried ones. You get what I mean 😉 . And you can easily make them glutenfree, if you use glutenfree oats and cornflakes.

The granolas I made are Cholocalte-Banana and Raspberry-Walnut.

IMG_7554

IMG_7526

You basically start off with your fruits and sweeteners. You cook them up in a small pan and then add your grains. You spread the sticky mixture over a baking paper and bake it in the oven. After this simple process you get your crunshy homemade granola.

Let’s start with the Chocolate-Banana-Granola:

IMG_7595

Duration time

10min preparation time

20-25min baking time

Ingredients (makes 520g or one big jar (see picture above))

❖ 1 overripe banana

❖ 1tbsp cacao

❖ 1tbsp agave nectar

❖ 1tsp whole cane sugar

❖ 2tbsp lemon juice

❖ 180g oats

❖ 40g puffed amaranth

❖ 90g unsweetened cornflakes

❖ 50g hazelnuts

❖ 50g seeds (I used a mixture of sunflower and pumpkin seeds)

❖ 50g dried apricots

❖ 30g raisins

Method

  1. Preheat the oven to 180°C circulating air.
  2. Mash the banana with a fork. Take a small pan, then add the mashed banana, cacao, agave, sugar and lemon juice. Whisk and bring to a boil until the mixture becomes thicker and sticky.
  3. Take a big bowl, add 120g of the oats and 20g of the amaranth, then put the sticky mixture over it. Now stir well. Afterwards add the cornflakes and mix once again, but gently.
  4. Take a baking tray, put baking paper on top, then spread the mixture over it. Bake in the oven for 20 to 25 minutes in total. Stir the granola every now and then, so that it doesn’t get burned.
  5. Now take the hazelnuts and chop them coarsely. Add them together with the seeds after 10min (don’t add them from the beginning, because they get burned more easily).
  6. Take the apricots and chop them into fine slices. Add them to the oven 5min before the granola is ready.
  7. Let the granola cool down. To finish add the raisins and the rest of the oats, amaranth and cornflakes in the big bowl. Add your baked granola and mix everything together (gently because the cornflakes break easily).

Now let’s talk about the Raspberry-Walnut-Granola:

IMG_7536

Duration time

10min preparation time

15min baking time

Ingredients (makes 360g or 3marmalade jars (see picture below))

❖ 110g frozen raspberries (if you use fresh ones you might need to add a bit of water or bake less time)

❖ 1tbsp coconut oil

❖ 1tbsp maple sirup

❖ 1tsp whole cane sugar

❖ 1tsp lemon concentrate

❖ 180g oats

❖ 55g millet flakes

❖ 35g walnuts (chopped)

❖ 5tbsp flax seeds

❖ 3tbsp chia seeds

❖ 2tbsp poppy seeds

❖ 35g cranberries

❖ 2tbsp goji berries

❖ 35g dark chocolate (chopped)

❖ 22g quinoa pops

Method

  1. Preheat the oven to 180°C circulating air.
  2. Take a small pan, add the raspberries, coconut oil, maple sirup, sugar and lemon concentrate. Whisk and bring to a boil until the mixture becomes thicker and sticky.
  3. Take a big bowl, add oats, millet flakes, walnuts, flax, chia and poppy seeds. Put the sticky mixture on top, then stir well.
  4. Take a baking tray, put baking paper on top, then spread the granola over it. Bake in the preheated oven for 15min in total. Stir every now and then.
  5. Add the cranberries and goji berries 5min before the granola is ready, so that they don’t get burned.
  6. Let the granola cool down, then add the chopped chocolate and the quinoa pops.

raspberry granola

Tip

Marmalade jars of homemade granola are also a nice present 🙂 .

Healthy and colorful Quinoa Bowl – with lots of steamed veggies

quinoa bowl

Wanted to try this bowl for a while now and finally found the time for it.

Going to visit the universal exhibition EXPO Milano 2015 this week. The topic is “Feeding the planet – energy for life”, which treats how to provide food for everybody, respecting sustainability. Did anybody of you already go there?

The event going on from wednesday to friday is called “Harissa – song and dance”. Harissa is a Tunisian hot chili pepper paste. The Tunisian Pavillion in Milan organizes show cooking and tasting events. Looking forward to it!

quinoa bowl2

Duration time

40min

Ingredients (makes 4 portions)

❖ 320g quinoa

❖ 775ml water

❖ 1tsp salt

❖ 3tbsp soymilk (sweetened)

❖ 1 broccoli

❖ 1 sweet pepper

❖ 1 zucchini/ courgette

❖ 2dl veggie broth

❖ 1tbsp oil

❖ 1 red onion

❖ 100g champignon

❖ 3tbsp soy sauce

❖ 2 tomatoes

❖ some garlic, coriander, cumin and chili powder (spice as you like)

❖ 1 can chick peas

❖ a bunch of coriander

Method

  1. Cook the quinoa in the water with salt and soymilk until the water is gone.
  2. In the meantime wash and chop the broccoli, sweet pepper and zucchini, salt to taste. Steam them until good. I used 2dl veggie broth for it.
  3. Chop the onion, champignons and tomatoes. Heat the oil in a pan and fry the onion, then add the champignons. Now add the soysauce and tomatoes. Season with the spices you like.
  4. When serving the quinoa don’t forget the chick peas. And sprinkle the chopped coriander on top of your bowl. 😉

Tip

You can eat it warm or as a salad as well.

Fruity Sorbet – Only 3 Ingredients

wpid-wp-1437325319119.jpeg
You probably noticed some changes here. When I started my blog I rather randomly chose a cute blog design I liked. But now I felt like I don’t want it so ordinary. I changed to a design that is simple, well-arranged and – the most important thing – it’s one I really like. I am happy with the decision and I guess I can now live with it for a long time. 😉

But let’s talk about this delicious sorbet. If you have an ice machine this is so easy to make. Maybe you are wondering why there is just one plum in the recipe. Well, we had one left and I think it makes the scoop more intresting, than just having a plain one.
wpid-wp-1437325328674.jpeg

Duration time

10min for preparation

30min for the ice machine

Ingredients (makes 3 portions of each 3 scoops)

❖ 500g apricots

❖ 1 plum

❖ 12 dates (soaked in water for 30min)

❖ a bit of the date-water (if necessary)

Method

  1. Remove the stones from the apricots and the plum, then put the fruits in a blender together with the soaked dates.
  2. If necessary add some date-water. Blend well.
  3. Now put the mixture in the ice machine. My sorbet needed 30min, but time can vary depending on your ice machine.

Chocolate-Chip-Hazelnut-Cookies

IMG_7091

Yummiiii…and so chocolaty. Watch out they can cause a chocolate-chip-hazelnut-cookie-addiction! But remember 😉 :

A balanced diet is chocolate in both hands.

And now enjoy!

cookies

Duration time

60min

Ingredients (makes 20 cookies)

❖ 225g soft margarine

❖ 100g sugar

❖ 1package vanilla sugar

❖ 1/2tsp salt

❖ 4tbsp soy milk

❖ 325g flour

❖ 2tbsp soy flour

❖ 1/2tsp baking powder

❖ 1/4tsp baking soda

❖ 70g whole hazelnuts

❖ 250g chocolate

Method

  1. Preheat oven to 180°C.
  2. Mix margarine, sugar, vanilla sugar, salt and soy milk in a big bowl.
  3. In another bowl mix flour, soy flour, baking powder and soda. Add this mixture to the other bowl, then mix everything well together.
  4. Cut the hazelnuts in half and the chocolate in small pieces (don’t worry if there are also some bigger pieces). Then stir and knead with your hands.
  5. Put a baking paper on your baking tray. Then form the cookies with your hands, with a diameter of more or less 7cm, place them on your baking paper and leave some space in between them.
  6. Bake them in the preheated oven for 25min.

Şakşuka – Turkish Veggie Salad

wpid-wp-1437324426882.jpeg

As we had some really hot days here in Switzerland, this turkish veggie salad was just a perfectly light and refreshing meal. The first time I had it was in a turkish restaurant in Peru. I liked it a lot and had to try this at home. I guess you pronounce it shakshuka. 😉 Enjoy!

wpid-wp-1437324433018.jpeg

Duration time

30min

Ingredients (makes 2 main dish portions)

❖ 1 eggplant

❖ 1 courgette

❖ salt and pepper

❖ 1 big onion

❖ 1 red sweet pepper

❖ 1tbsp thyme

❖ some paprika powder

❖ 2-3 tomatoes

❖ 5 tbsp olive oil

❖ 3 tbsp vinegar

❖ some fresh dill

❖ some grated hazelnuts

Method

  1. Cut the eggplant and courgette into small cubes, put them in a bowl, then add 3tbsp of oil. Mix well and let the veggies soak the oil. Season with some salt and pepper.
  2. Cut the onion into rather big pieces. Cut the sweet pepper lengthwise and then half.
  3. Heat 1tbsp of olive oil in a pan. Fry the eggplant and courgette first, then add the onion. At the end the sweet pepper, thyme and paprika powder.
  4. Now cut the tomatoes into cubes. Add to a bowl. Let the cooked veggies cool down, then add them as well.
  5. Mix 1tbsp of olive oil with the vinegar, then pour this sauce over the salad. Chop the dill, then add. Season with salt and pepper.
  6. Sprikle the grated hazelnut on top.

Raspberry Coconut Streusel Cake

image

Are you vegan? If you are, you probably know that it’s sometimes difficult to join a birthday or barbecue party. You either get nothing of the great bunch of food because you can’t find anything vegan or you bring something yourself and eat only that. 😉 OR you have a great friend who prepares this really nice and fruity streusel cake for you! 😍 I even got iced coffee with soy milk! He gave me the recipe of the cake so I could share it with you. Here you go:

wpid-wp-1437322998981.jpeg

Duration time

15min preparation time

50min baking time

Ingredients (makes half a baking tray)

❖ 200g flour

❖ 200g sugar

❖ 200g grated coconut

❖ 1 pinch of salt

❖ 200g margarine

❖ 400g frozen raspberries

Method

  1. Preheat the oven to 180° with circulating air.
  2. Mix the flour, sugar, grated coconut and salt in a bowl.
  3. Melt the margarine then add to the bowl. Use your hands to make the streusel.
  4. Now put a baking sheet on the tray and spread 2/3 of the streusel on it.
  5. Spread the raspberries, then add the rest of the streusel over it.
  6. Bake for 40min in the preheated oven. Then turn it off, but let the cake rest 10 more minutes in it.

Chinese inspired veggie pan

wpid-wp-1437322003507.jpeg

I have to admit I didn’t cook nor create this recipe, but my boyfriend did for me. And he always knows best what to mix together, because it turns out delicious all the time. This one is inspired by chinese cuisine, because it is made with soy sauce and pineapple juice, which gives it a light sweet flavour. If you like it hot add some spices. 😉

wpid-wp-1437322007945.jpeg

Duration time

40min

Ingredients (makes 3 small or 2 big portions)

❖ 1,5 cups basmati rice (300g)

❖ 2 1/4 cups water (1,5 times the amount of rice)

❖ 1 broccoli

❖ 1 onion

❖ 2tbsp oil

❖ 10tbsp soy sauce

❖ 250g champignions

❖ 1 sweet pepper

❖ 1 small can pineapple

❖ 6tbsp of the pineapple juice

❖ salt

❖ paprika and chili

Method

  1. Cut the veggies and pineapple into small pieces.
  2. Wash the rice, heat the water with salt, then cook the rice in it until good.
  3. Heat the oil in a pan, then add the broccoli and onion first. Add 5tbsp soy sauce.
  4. Now add the pineapple juice and the rest of the soy sauce with the rest of the veggies and the pineapple.
  5. Season with salt, paprika and chili. Stir and let it cook until done.

ENJOY!

Potatoe salad – for a nice barbecue evening

image
In my last recipe I showed you how to make vegan mayonnaise. I used mine for this delicious potatoe salad. I prepared a big bowl for a barbecue birthday party. I didnt’t tell anybody that I didn’t use normal mayonnaise, because I wanted to know if they would find out. Everybody liked the salad and later in the evening I was asked “but weren’t you vegan? Mayonnaise is made with eggs, isn’t it?”. They were really surprised when I told them how I made it.

wpid-wp-1435783646235.jpeg

Btw. the potatoes I used are from my little veggie bed in the garden. :mrgreen: 🌿
Duration time

50min

Ingredients (for 4 side dishes)

❖ 6 potatoes (approx. 600g)

❖ 1 small onion

❖ 4tbsp vegan mayonnaise

❖ 1tbsp olive oil

❖ 2tbsp apple vinegar

❖ 1/2 sweet pepper

❖ 4 pickled gherkins

❖ salt

❖ pepper

❖ dill/ parsley (you can see on the pictures, that I made it once with each of them. I personally prefer dill 🙂 )

Method

  1. Cook the potatoes until they are done (and not too soft).
  2. Let them cool, then cut into small cubes.
  3. Cut the onion really finely. Put onion and potatoes into a bowl.
  4. Now add the mayo, oil and vinegar. Mix, then put it in the fridge so that the potatoes can soak the dressing.
  5. Now cut the pepper into really small cubes, slize the pickled gherkins. Add to the bowl, then season with salt and pepper.
  6. Cut the herbs, add them at the end, then mix well.

Tipp

Let it stay in the fridge for some time so the potatoes can soak in the dressing, which makes the salad even more delicious.

Homemade Mayonnaise

image

Before I became vegan I ate mayonnaise every now and then, but not really a lot. The last time was actually long ago, so I really felt like having some. Now in summer even more. It’s the perfect time to barbecue. You can use the mayo to prepare a delicious potatoe salad or eat your grilled veggies and fries with it. So, when I feel like having some mayo I prepare this super easy recipe. Give it a try, you will be surprised how good it tastes. I have seen some recipes for vegan mayonnaise, but all of them had twice the amount of oil in comparison to the soy milk. I thought that’s a lot and tried using less. It worked perfectly. However, if the consistency is too liquid try adding more oil or mustard if you like.
Duration time

15min

Ingredients (makes 1 jam jar)

❖ 130ml soy milk (must be cold, coming directly out of the fridge!)

❖ 100ml rape oil (room temperature!)

❖ 4tsp mustard

❖ 1tsp apple vinegar

❖ 1tsp fresh lemon juice

❖ 2 pinches of salt

❖ some pepper if you like

Method

  1. Put all the ingredients in a high vessel, then blend (I used a hand blender).

That’s all! Enjoy!

Tipp
Store in the fridge for up to 2 weeks.

Easy Breakfast Pancakes

wpid-wp-1436638378821.jpeg

WEEKEEEND!
On weekends I like to take my time and prepare a yummi breakfast. This morning I made these easy pancakes. And it didn’t even take me long. Enjoy them warm with maple sirup, fruits, cinnamon and sugar or chocolate, they are just delicious.

wpid-wp-1436629098802.jpeg

Now that I look at these pictures I would like to have some more pancakes 😀 .

Duration time

15min

Ingredients (makes 6 pancakes)

❖ 200g flour

❖ 13g vanilla sugar

❖ 1tsp baking powder

❖ 1/2tsp salt

❖ 1tsp soy flour (or any other egg substitute like a mashed banana)

❖ 300ml soy milk

❖ 1tbsp rape oil

Method

  1. Mix the dry ingredients then add the milk and oil.
  2. Mix everything together.
  3. Heat the pan and add some oil, then make your pancakes by adding some dough to the heated pan.

Banana-Maca-Bread – without additional sugar

wpid-wp-1435689715771.jpeg

Hey guys! I am back from my 3 month trip to Peru. And I decided that it’s the right moment to make some changes on my blog. I thought about this for a longer time now and finally decided to change the language for my future posts from German to English. As English is not my mother language things will be maybe a bit more difficult, or lets say more time taking for me, but I will be able to share my recipes with all my visitors from everywhere around the world and that’s great. It’s also a good way to practice my English!

Before I left for Peru, I had basically all of the recipes, which I wanted to post during these 3 months, already done. Not only the cooking/ baking but also the writing. So I could easily post one recipe a week without having to plan how or where to make the dish on my trip. But that also meant, that I couldn’t do any new things or try out some ideas I had in my mind. When I came back last week I was so happy to have a kitchen again where I can do whatever I want to. But there’s a little problem with that, I’ll come back to it later…

There’s another thing i’d like to do from now on. I simply want to use more and different kind of “superfoods” as ingredients in my recipes and get to know about their benefits. I already have a large stock of different flours and powders, which are waiting to be used ;).

So back to that kitchen story. After coming home I already had to get my stuff together and move to my new apartment in Lausanne (which is in the french part of Switzerland). I started my french course on monday, which is like a preparation for my studies. The problem here is, that the kitchen is not really equipped. No scale, no measuring jug, no mixer and no cake pans… HOW AM I SUPPOSED TO LIVE HERE? Well, it’s not that bad. It will just take some time until I have all that stuff together. So, that makes it a bit difficult to give you the exact measurements, but I will try my best! I just bought a measuring jar with milliliters and gram indexes for flour and sugar. That has to work for now.

(There will maybe be some more little changes, I am still experimenting with this blog 🙂 )

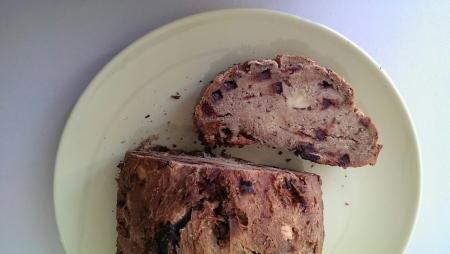
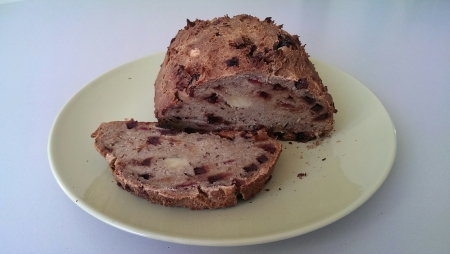
The summary of all what I said now is this delicious banana bread: First of all it is something I wanted to try for a long time now, then I added the superfood maca to the recipe, I didn’t use a mixer and I couldn’t do it in a cake pan, like you normally should. But hey, it worked and it tastes incredibly!

About the maca:
I am going to give you some facts about this maca root, which can be found in the peruvian Andes, in over 4000m over sealevel. To grow there you really have to be tough and be able to stand to the cold and strong UV-light up there. The maca adapted to these circumstances and the crazy thing about it is, that it helps the person who consumes it to also be tough and adapt to stressful situations. It makes you more stressresistant, gives you a lot of energy and makes you feel awake. Furthermore it is used to improve the performance in sports. And finally also as aphrodisiac, to increase the virility and fertility.
It contains a lot of nutrients, vitamines, proteins, fibers and healthy fats. Also intresting for vegans is its high content of calcium.
It is suggested to eat 1-2 teaspoons a day. You can for example simply add it to your oatmeal or smoothie. The taste is a bit nutty, i like it, but try it out yourself!

wpid-wp-1435700138773.jpeg

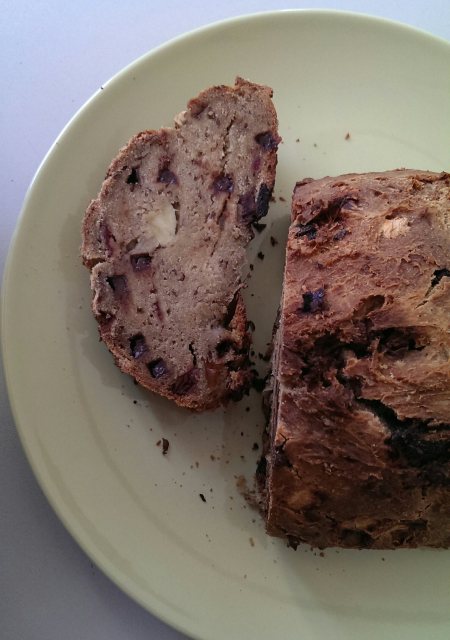
It says no additional sugar, because the dark chocolate I used contains sugar, but I didn’t add any more. The sweetness comes from the banana itself but also from a bit maple sirup and some dates.

wpid-wp-1435700166249.jpeg

Duration time

20min preparation time

45min baking time

Ingredients (makes one bread)

❖ 200g quinoa flour

❖ 350g flour (optional glutenfree)

❖ 3tbsp maca powder

❖ 1tsp baking powder

❖ 3tbsp flax seeds

❖ 4 bananas (if possible 3 really ripe ones and one fresh one)

❖ 150ml soy yogurt

❖ 100ml rape oil

❖ 3tbsp maple sirup

❖ 10 Dates (soaked in water for 30min)

❖ 100g chocolate chips

Method

  1. Preheat the oven to 200° with circulating air.
  2. Mix all the dry ingredients (flours, powders and seeds) together. I used a whisk and mixed everything by hand, but you can of course use a mixer if you got one in your kitchen 😉
  3. Mash the ripe bananas and mix them with the yogurt, oil and sirup. Now pour that mix to the dry ingredients and mix everything together.
  4. Cut the fresh banana and the soaked dates into small pieces. Add them with the chocolate chips to the mixture, now mix everything well together. I used my hands.
  5. Put baking paper on a baking sheet, then place the dough on there.
  6. Now bake for 45min in the preheated oven.

Tipp

Banana bread is normally baked in a cake pan, because it’s like a mix of bread and cake. I just added more flour to this recipe than I would to a normal banana bread baked in a cake pan. So you can easily just place it on the baking sheet. I suppose it would also work in a cake pan, if you prefere using one.

This bread can easily be made glutenfree. Quinoa flour already is, therefore you can chose another glutenfree flour to add. Because the gluten helps to stick everything together you need a gluten alternative, I used flax seeds, but you could also use chia seeds for example.

Lots of love and hopefully until soon (I have to think of something nice I can make here in this poorly equipped kitchen).

Update: Language Change – posting from here on in English

image

This little blogpost is just for your information. I changed from German to English the 28 of June. The recipes up to that date are in German, the ones from there on in English. That’s why this post is not dated today, but earlier. I talk about the reasons of this change in the following post (banana-maca-bread).

Ofen-Süsskartoffeln

Süsskartoffelscheiben

Süsskartoffelscheiben

Ob als Beilage oder für den kleinen Hunger, diese würzigen Ofen-Süsskartoffeln schmecken immer. Süsskartoffeln werden meiner Meinung nach viel zu oft unterschätzt und bei uns zu wenig eingesetzt, dabei kann man so viel aus dieser Knollenpflanze rausholen… [mehr]

Chia Pudding

Chia Pudding mit Beeren

Chia Pudding mit Beeren

Chia Samen, mittlerweile kennt sie jeder! Die Chia Samen stammen aus der Zeit der Mayas und wurden damals als Grundnahrungsmittel verwendet. Sie sind reich an Antioxidantien, Proteinen, Vitaminen, Ballast- und Mineralstoffen und werden deshalb bei uns als “Superfood” bezeichnet. Sie enthalten zum Beispiel 5 Mal mehr Kalzium als Vollmilch… [mehr]

Creative Blogger Award

image Hallo ihr Lieben
Ich freue mich sehr über meine erste Nominierung. Vielen Dank an Van von van vegan und an das kleine vegetarische Kochbuch. Ich habe mich entschieden diese Gelegenheit dazu zu nutzen euch nebst einigen Fakten über mich auch ein kleines Update über meine aktuelle längere Reise zu geben… [mehr]

Maniok-Bällchen

Frittierte Bällchen aus Maniok

Frittierte Bällchen aus Maniok

Maniok ist eine Wurzelknolle, die ihren Ursprung in Südamerika hat. Mittlerweile kennt man sie auch hier. In Peru nennt man den Maniok Yuca. So ist auch der Originalname des Rezeptes: Bolitas de Yuca. Der Geschmack ist ähnlich wie der einer Kartoffel. Man isst die Yuca häufig einfach geschält und dann gekocht als Beilage… [mehr]

Empanadas

Empanadas frisch aus dem Ofen

Empanadas frisch aus dem Ofen

Empanadas sind gefüllte Teigtaschen, die man in Peru an jeder Strassenecke kaufen kann. Gefüllt werden sie meistens mit Rindfleisch, Poulet oder Käse. Diese habe ich immer liebend gern gegessen – bevor ich vegan wurde, natürlich. Wie dieses Rezept beweist, sind vegane Empanadas aber auf jeden Fall genauso lecker. Wichtig ist, dass man sie gut würzt. Die Original-Empanadas werden mit “Ají amarillo” gewürzt… [mehr]

Alfajores

Alfajor2

Alfajores

Alfajores sind in Peru etwa so wie die Prinzenrolle bei uns: Ein Kekssandwich mit Füllung und jeder kennt’s. Beim Alfajor gibt’s verschiedene Varianten, üblicherweise wird jedoch zwischen die beiden Kekshälften dulce de leche hineingeschmiert. Dulce de leche ist eine karamellig schmeckende Paste, die durch das Einkochen von Milch hergestellt wird… [mehr]

Dulce de leche

Dulce de leche

Dulce de leche ist eine süsse Paste, die üblicherweise aus Milch hergestellt wird. Die Milch wird dafür lange gekocht, sodass sie eindickt. Der Geschmack ähnelt einer Mischung aus Kondensmilch und Karamell. Verwendet wird sie in Peru und anderen südamerikanischen Ländern für viele verschiedene Nachspeisen. Eine davon sind “Alfajores”. Das ist sozusagen ein “Kekssandwich” mit Dulce de leche dazwischen… [mehr]

Peruanisches Cebiche mit Champignions

image

Gerichte aus Südamerika: Cebiche ist eines der peruanischen Nationalgerichte. Man isst es in allen Regionen des Landes und es gibt sogar einen Tag des Cebiches (28. Juni). Traditionellerweise wird es aus rohem Fisch und roter Zwiebel zubereitet, welche in Limettensaft mariniert werden. Gewürzt wird es mit Salz, Pfeffer, Chili und Koriander… [mehr]

Quinoasalat mit Avocado und Orange

Quinoasalat

Quinoasalat

Quinoa gehört in Peru zu den Grundnahrungsmitteln. Hier habe ich es als Kind auch schon oft gegessen. Mittlerweile gibt es Quinoa auch bei uns in den Läden zu kaufen. Quinoa ist eine der besten pflanzlichen Eiweissquellen, ausserdem ist es glutenfrei. Und natürlich, wie so oft, wenn wir hier bei uns neue, bisher unbekannte Lebensmittel mit “Superkräften” entdecken, wird die Quinoa als Superfood bezeichnet… [mehr]

Karibischer Bohneneintopf mit Kochbananen

Bohneneintopf mit Kochbananen

Bohneneintopf mit Kochbananen

Gerichte aus Südamerika: Heute der erste Post zu diesem Thema. Obwohl man dieses Gericht wohl eher der Karibik zuordnen muss. Aber wir drücken hier mal ein Auge zu ;). Schmecken tut’s auf jeden Fall. Die Kochbananen ergänzen den Eintopf perfekt. Wer mag, kann aber auch Reis dazu machen. Die Bananen sind reif, wenn die Schale schon bräunlich ist… [mehr]

Zöpfli

Zöpfli

Zöpfli

Schweizer Woche: Diese Woche ist voll und ganz dem Thema ¨Schweizer Gerichte¨ gewidmet. Nebst Birchermüsli und Rösti gab es diese Woche auch den traditionellen Schweizer Zopf, bzw. Zöpfli. Der Hefezopf wurde durch einen Schweizer Bäcker erfunden und wird heutzutags gerne zum Sonntagsbrunch verzehrt. Das Rezept ist veganisiert und ergibt ca. 8 Zöpfli oder einen grossen Zopf… [mehr]

Rösti

image

Schweizer Woche: Kartoffeln gibt es in Peru zwar in Mengen und vor allem in den verschiedensten Arten, Farben und Formen. Dennoch werde ich hier während den nächsten drei Monaten in Peru die traditionelle Schweizer Rösti wohl nicht antreffen. Die gabs dafür diese Woche ein letztes Mal noch vor meinem Abflug… [mehr]

Birchermüsli

Birchermüsli

Birchermüsli

Schweizer Woche: Diese Woche sollte es nochmal richtig traditionell Schweizerisch werden. Da ich heute für drei Monate nach Südamerika reise, werde ich wohl längere Zeit auf dieses feine Schweizer Birchermüsli verzichten müssen. Die Zubereitung kann individuell und je nach Geschmack einfach angepasst werden. Hier habe ich unteranderem z.B. Gojibeeren verwendet (nicht ganz Schweizerisch, ich weiss 😉 ), die man durch getrocknete Aprikosenstücke… [mehr]

Update: Über Lucy

LucyÜber Lucy

Jetzt auch mit Foto! 🙂

Seit einigen Monaten bin ich nun schon vegan. Für mich hat sich seither vieles verändert. Nicht nur meine Essensweise, vielmehr meine gesamte Einstellung gegenüber Tiernutzung und -ausbeutung, Nachhaltigkeit und unsere verschwenderische Lebensweise. Ich habe angefangen, Zutatenlisten zu hinterfragen und mich bewusster mit dem auseinander zu setzen, was ich zu mir nehme. Dass man immer öfter selbst kocht… [mehr]

Reise nach Südamerika

Machu Picchu - Peru

Machu Picchu – Peru

Hallöchen meine Lieben!

Bald werde ich für drei Monate nach Peru reisen und deshalb wahrscheinlich nur noch einmal in der Woche etwas posten. Es werden aber einige südamerikanisch angehauchte Rezepte sein, sodass ich euch, wenn auch nur kulinarisch, mit auf meine Reise nehmen kann :).

Umbedingt dabei bleiben!

Rotes Thai Curry mit Gemüse

Rotes Curry mit Gemüse und chinesischen Nudeln

Rotes Curry mit Gemüse und Nudeln

Thai Sunday: Heute gibt’s gleich noch ein asiatisches Gericht. Dieses habe ich zwar nicht selbst zubereitet, sondern meine Schwester mit ihrem Freund. Dennoch möchte ich es euch nicht vorenthalten, weil es so gut geschmeckt hat und sie sich die Mühe gemacht haben, das Ganze vegan zu kochen 😉 … [mehr]

Mango Sticky Rice

Mango Sticky Rice

Mango Sticky Rice

Thai Sunday: Mango mit Sticky Rice haben wir letztes Jahr, während unseren Ferien in Thailand, fast jeden Morgen zum Frühstück gegessen. Man braucht dafür den speziellen sticky rice (auch sweet oder glutinous rice genannt), welchen ich im Thai-Laden gekauft habe… [mehr]

Fruchtige Apfeltorte

Apfeltorte mit Sahne und Schokoraspeln

Apfeltorte mit Sahne und Schokoraspeln

Diese leckere, vegane Apfeltorte lädt zum gemeinsamen Schlemmen und Geniessen ein. Sei es als Geburtstagskuchen, zum Sonntag-Nachmittag-Kaffee oder Dessert, Apfeltorte macht sich immer gut. Der Anlass dieses Mal war, dass Bettina (ihr könnt euch bestimmt an ihr “Flammende Herzen”-Rezept erinnern, welches ich vor Kurzem in diesem Post veganisiert habe) mir vorgeschlagen hat, einen Guest Post zu verfassen… [mehr]

Pasta mit Gemüse-Bolognese

Gemüse-Bolognese

Gemüse-Bolognese

Wenn ich etwas koche/backe überlege ich mir üblicherweise zuerst, was es sein soll und gehe dann entsprechend einkaufen. Als ich jedoch letzthin wieder einmal im Reformhaus war und vor dem Kühlregal mit den vielen verschiedenen Tofusorten stand, hatte ich Lust eine neue davon zu testen. Meine Wahl fiel auf den Tofu Rosso von Taifun. Ich habe euch hier mal aufgelistet, was da alles, nebst Tofu, noch drin ist… [mehr]

Curry-Linseneintopf

Curry-Linseneintopf

Curry-Linseneintopf

Linsen gibt es in den Farben schwarz, braun, grün, rot und gelb. Ebenso vielseitig sind die Gerichte, die man aus Linsen zubereiten kann; sei es indisches Dal, im Eintopf, als Aufstrich, Salat usw. Sie enthalten viel Eiweiss und machen lange satt. Diesen indisch angehauchten Eintopf haben wir zudem mit jeder Menge Gemüse zubereitet: Möhren, Kartoffeln, Brokkoli, Paprika und Aubergine… [mehr]

Rührtofu

Rührtofu zum Frühstück

Rührtofu zum Frühstück

Wie im Post Tomaten-Kern-Brötchen verprochen, gibt’s hier das Rezept zum Rührtofu. Solche, die gerne mal ein Rührei zum Frühstück essen, werden überrascht sein, wie ähnlich diese vegane Variante schmeckt. Speziell daran ist das indische Schwefel-Salz, dass ich für die Zubereitung verwendet habe. Und zwar kommt man dadurch dem Ei-Geschmack extrem nah. Die gelbe Farbe erhält man durch das Gewürz Kurkuma… [mehr]

Zitronenmuffins

Zitronenmuffins mit Mandeln und Cranberries verziert

Zitronenmuffins mit Mandeln und Cranberries verziert

Ich liebe Zitronenkuchen. Die Zitrone verleiht ihm einen so frischen und sommerlichen Geschmack. Die Temperaturen in der Schweiz steigen und der Frühling scheint angekommen zu sein. Perfekter Zeitpunkt, um Zitronenkuchen zu backen. Da jedoch ein Kuchen von der Menge her etwas zu viel des Guten gewesen wäre, habe ich diese Zitronenmuffins gemacht… [mehr]

Buchweizenbrot

Glutenfreies Buchweizenbrot

Glutenfreies Buchweizenbrot

Der Name Buchweizen führt irrtümlicherweise zu der Annahme, es handle sich dabei um ein Getreide. Ich kenne es aus meiner Kindheit, als ich die Früchte des Buchweizens auf dem Schulweg aufgesammelt und diese Nüsschen nach dem Entfernen der Schale gegessen habe. Seither habe ich jedoch nie wieder Buchweizen gegessen und war umso überraschter, als ich kürzlich ein Rezept mit Buchweizenmehl fand… [mehr]

Koshari

Koshari - Reis-Linsen-Hörnli-Mix mit scharfer Tomatensauce, Kichererbsen und frittierten Zwiebeln

Koshari – Reis-Linsen-Hörnli-Mix mit scharfer Tomatensauce, Kichererbsen und frittierten Zwiebeln

Dieses ägyptische Gericht besteht aus einem Mix aus Reis, Linsen und Hörnli (Makkaroni). Obendrauf gibts eine scharfe Tomatensauce, Kichererbsen und frittierte Zwiebeln. Ich wäre wohl nie darauf gekommen Reis, Linsen und Pasta nach der Zubereitung zu mischen, wäre ich nicht vor Kurzem auf einem London-Trip auf den Take away Betrieb “koshari street” gestossen… [mehr]

Hummus

Hummus

Hummus

Kichererbsen können so vielseitig eingesetzt werden. Dies beweist die orientalische Küche; sei es als Kichererbsencurry, Falafelbällchen, in Salat, Suppe oder Eintopf. Und natürlich nicht zu vergessen als Hummus. Kichererbsen enthalten viel Eiweiss und sind somit eine super Proteinquelle (vor allem für Vegetarier und Veganer). Gegessen wird Hummus oft mit Fladenbrot… [mehr]

Orientalischer Couscous-Strudel

Couscous-Strudel

Couscous-Strudel

Dies ist ein weiteres adaptiertes Rezept aus dem veganen Kochbuch “Peace Food” von Ruediger Dahlke. Das Buch ist voll mit tollen Rezepten, die ich noch ausprobieren möchte. Dieser Couscous-Strudel ist orientalisch angehaucht und kann gut mit einem leichten Salat serviert werden. Ich finde es toll, dass, wie in der orientalischen Küche üblich… [mehr]

Avocado-Dattel-Creme mit Himbeeren

Avocado-Dattel-Creme mit Himbeeren

Avocado-Dattel-Creme mit Himbeeren

Nach einem aufwändig zubereiteten Hauptgericht soll noch ein tolles Dessert her? Nichts einfacher als das. Für diese Avocado-Dattel-Creme brauchst du nicht mehr als 15 Minuten und erhältst dennoch eine feine, gesunde Nachspeise. Die Avocado ist eine Frucht voll mit Ballaststoffen, Vitaminen und gesunden Fetten. Wenn man von Avocadocreme spricht… [mehr]

Möhren-Haselnuss-Spaghetti

Möhren-Haselnuss-Spaghetti

Möhren-Haselnuss-Spaghetti

Nach meiner Frühstücksbrötchen-Orgie gibt’s heute zur Abwechslung ein Hauptgericht. Diese Möhren-Haselnuss-Spaghetti gehören zu meinen Lieblingsgerichten und das Rezept ist super einfach! Das Haselnussmus darin gibt dem Ganzen eine sämige Konsistenz, so wie es zum Beispiel mit Parmesankäse der Fall ist. Der nussige… [mehr]